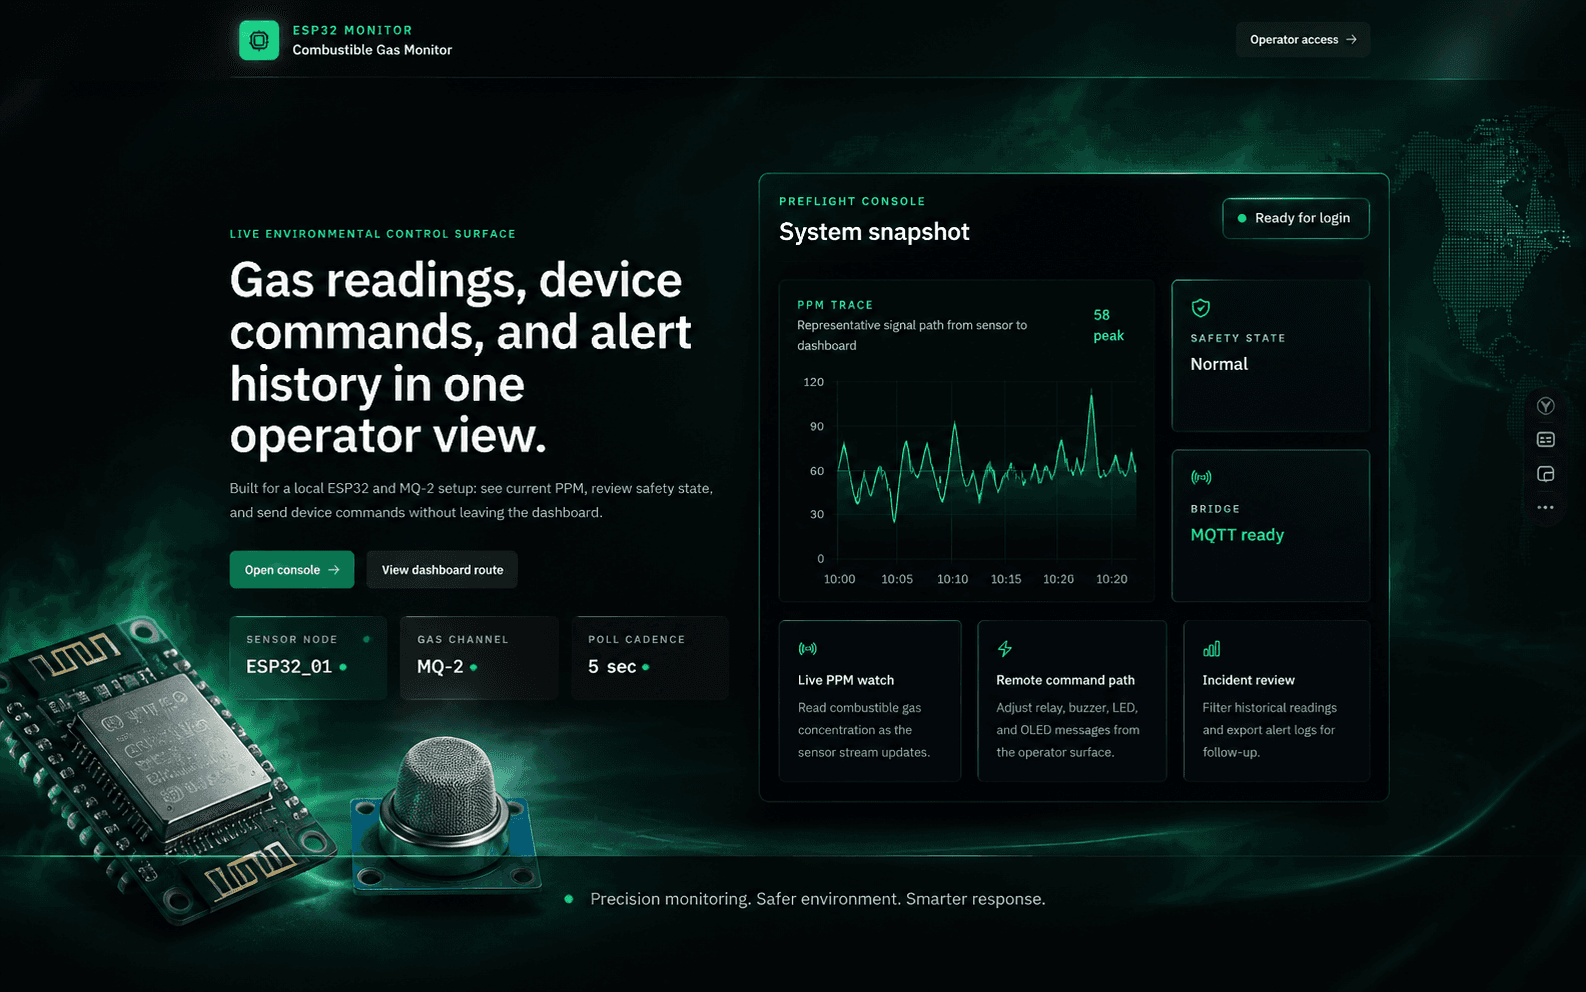
ESP32 Air Quality Monitor
A comprehensive IoT system for real-time air quality monitoring using ESP32, MQ-2 gas sensor, DHT temperature/humidity sensor (DHT11/DHT22), MQTT communication, and a responsive web dashboard with Firebase Authentication.
Real-time air quality monitoring built around the ESP32, wired to an MQ-2 combustible gas sensor, a DHT11/DHT22 temperature & humidity sensor, a 0.96" OLED display, and a relay for remote load control. Sensor data streams over MQTT to a Node.js bridge and into a responsive Next.js dashboard — live PPM readings with color-coded quality levels, historical charts, remote device controls, and Firebase authentication.
Tech Stack
 ESP32
ESP32 C++
C++ PlatformIO
 MQTT
MQTT Node.js
 Next.js
 TypeScript
 Firebase
README
ESP32 Air Quality Monitor
A comprehensive IoT system for real-time air quality monitoring using ESP32, MQ-2 gas sensor, DHT temperature/humidity sensor (DHT11/DHT22), MQTT communication, and a responsive web dashboard with Firebase Authentication.
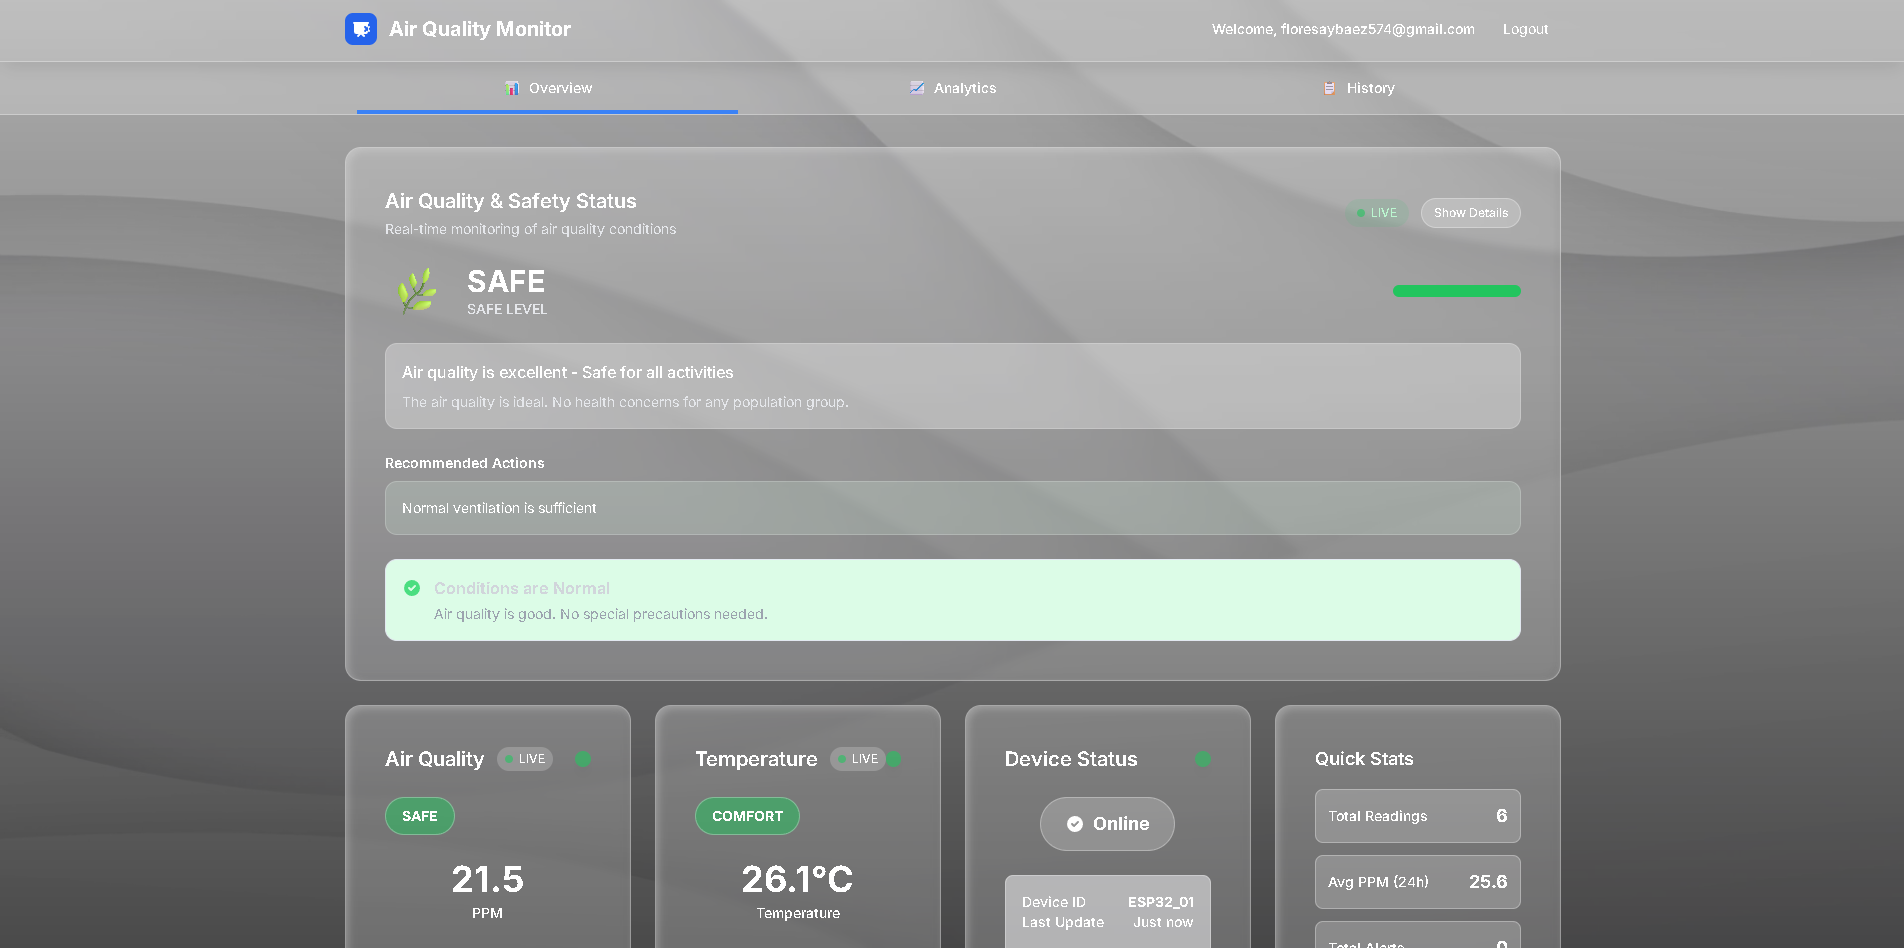
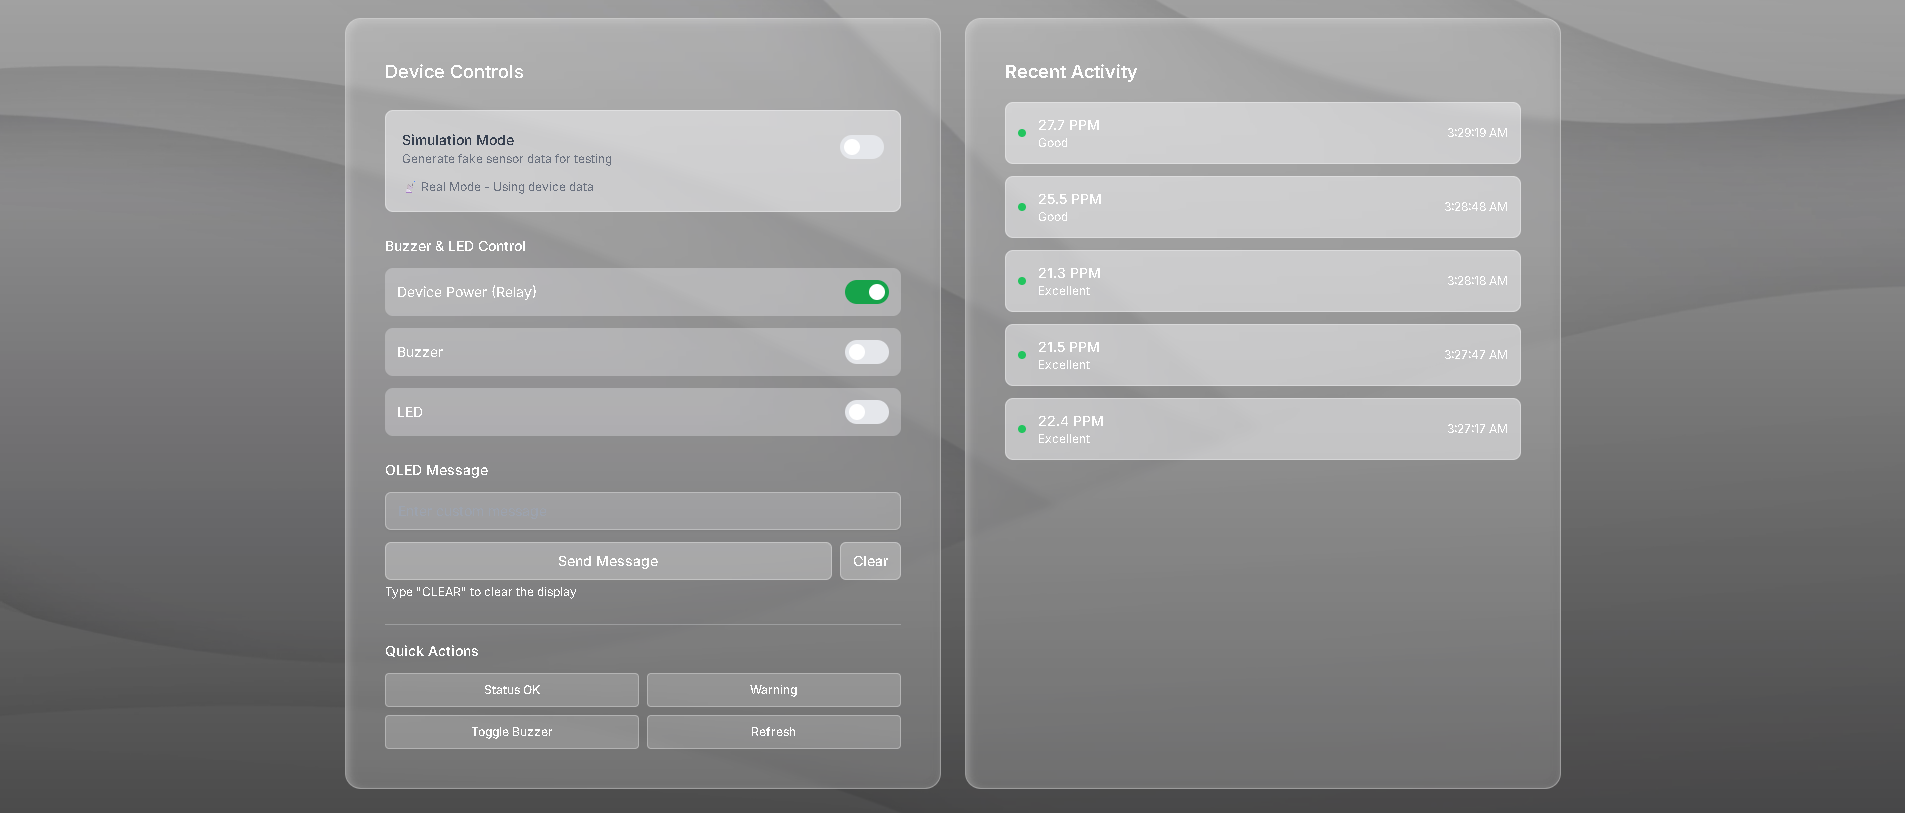
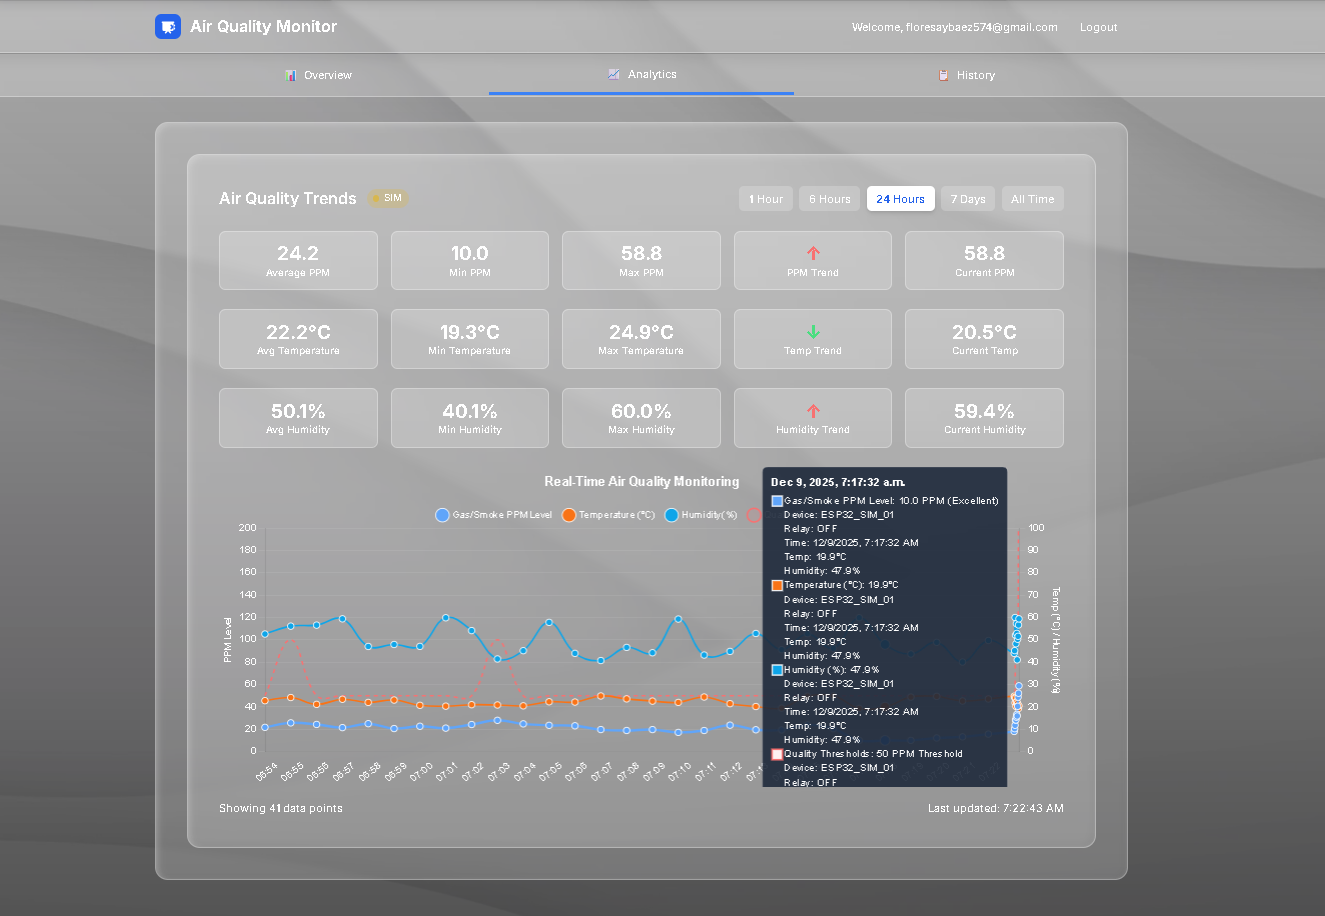
Preview
| Dashboard View 1 | Dashboard View 2 |
|---|---|
 |  |
 | 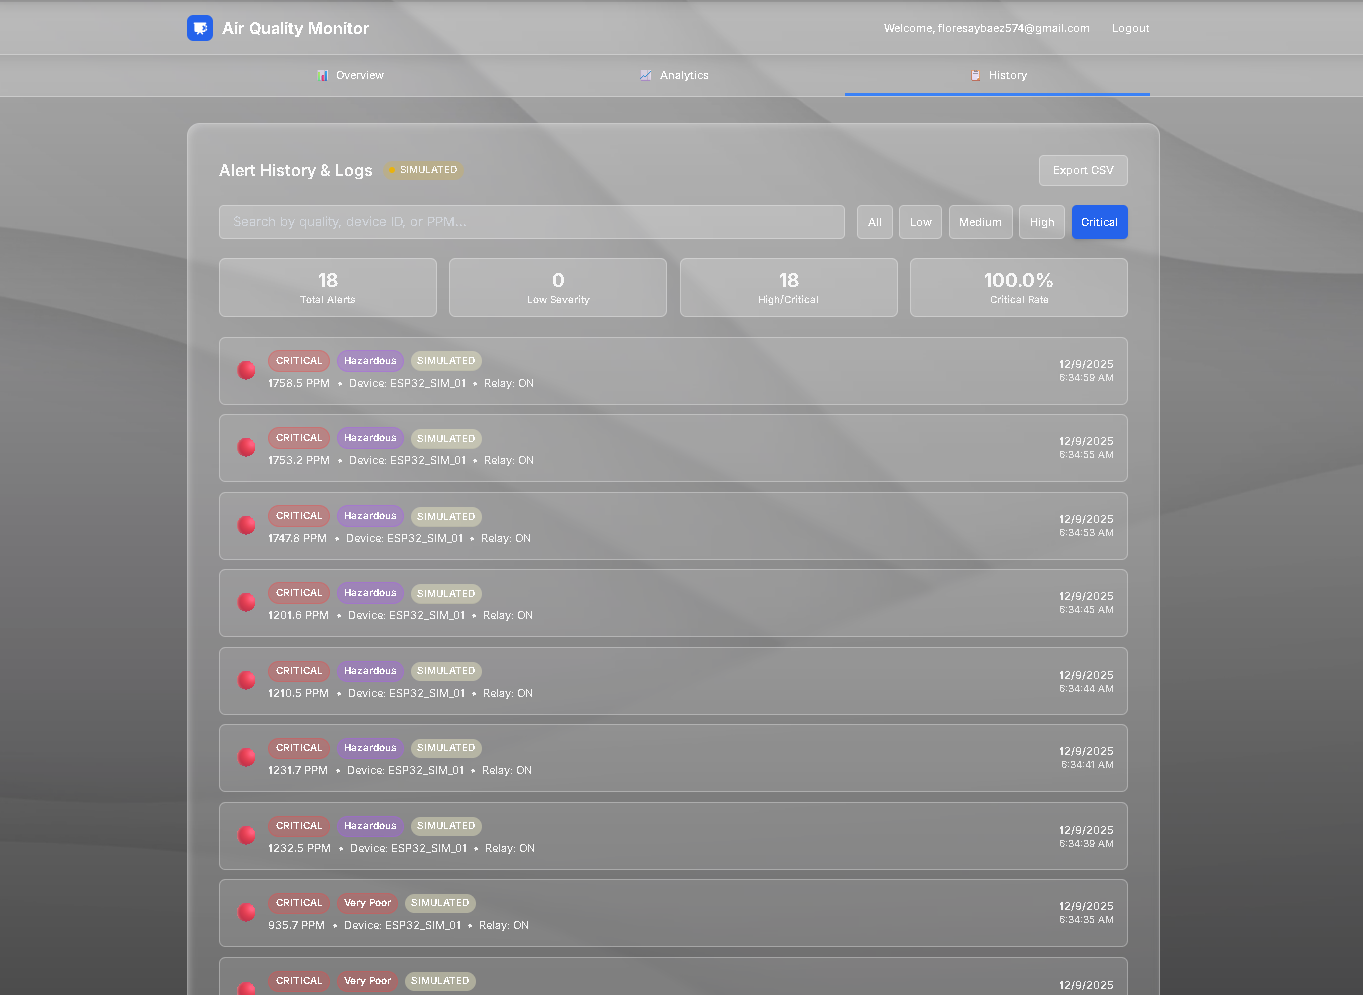 |
Features
ESP32 Device
- Real-time Sensing: MQ-2 combustible gas sensor with PPM readings
- Temperature & Humidity: DHT11/DHT22 sensor for environmental monitoring (configurable with calibration)
- Local Display: 0.96" OLED showing current air quality and relay status
- MQTT Communication: Reliable MQTT-based data transmission
- WiFi Connectivity: Reliable WiFi connection with automatic reconnection
- Remote Control: MQTT-based commands for relay and display control
Web Dashboard
- Real-time Monitoring: Live air quality data and device status
- Historical Charts: Interactive charts showing trends (24h, 7d, all-time)
- Device Control: Remote relay control and sampling interval adjustment
- Custom Messages: Send custom text to OLED display
- Responsive Design: Mobile-friendly PWA with install support
- Authentication: Secure Firebase Auth integration
MQTT Bridge
- Real-time Communication: Bidirectional MQTT message handling
- API Integration: RESTful endpoints for dashboard communication
- Command Relay: Forwards commands between dashboard and ESP32
- Error Handling: Robust error handling and logging
System Architecture
ESP32 (MQ-2 + OLED + Relay)
       │ WiFi MQTT
       ▼
MQTT Broker (broker.hivemq.com)
       │
       ▼
MQTT Bridge (Node.js)
       │ HTTP API
       ▼
Responsive Web Dashboard (Next.js / React)
       │
       ▼
Firebase Authentication
Hardware Requirements
Components
- ESP32 Dev Board
- MQ-2 Gas Sensor
- DHT11 or DHT22 Temperature/Humidity Sensor
- 0.96" OLED Display (I2C, SSD1306)
- 5V Relay Module (optional)
- Breadboard and Jumper Wires
- Micro USB Cable
Pin Connection Table
| Component | Component Pin | Wire Color (Suggested) | ESP32 Pin | Function |
|---|---|---|---|---|
| OLED Display | ||||
| OLED | VCC | Red | 3.3V | Power Supply |
| OLED | GND | Black | GND | Ground |
| OLED | SDA | Blue | GPIO21 | I2C Data |
| OLED | SCL | Yellow | GPIO22 | I2C Clock |
| MQ-2 Sensor | ||||
| MQ-2 | VCC | Red | 5V | Power Supply |
| MQ-2 | GND | Black | GND | Ground |
| MQ-2 | AOUT | Green | GPIO34 | Analog Output |
| DHT11/DHT22 Sensor | ||||
| DHT | VCC | Red | 3.3V | Power Supply |
| DHT | GND | Black | GND | Ground |
| DHT | DATA | Yellow | GPIO14 | Digital Data Pin |
| Relay Module (bidirectional control) | ||||
| Relay | VCC | Red | 5V | Power Supply |
| Relay | GND | Black | GND | Ground |
| Relay | IN | Orange | GPIO26 | Control Signal (ESP32 → Relay) |
| Relay | NO (Normally Open) | Yellow | Device Load | Output (Relay → External Device) |
| Relay | COM (Common) | Blue | Device Load | Common Terminal |
| Relay | NC (Normally Closed) | Green | Device Load | Output (Relay → External Device - normally closed) |
Quick Start
1. Software Requirements
- Visual Studio Code
- PlatformIO IDE (VS Code extension)
- Bun (v1.0 or higher)
- Git
2. Firebase Setup (Authentication Only)
- Go to Firebase Console
- Create a new project
- Enable Authentication (Email/Password or Google)
- Get your Firebase configuration from Project Settings → General → Your apps
3. Project Setup
# Clone the repository
git clone https://github.com/your-username/ESP32AirQualityMonitor.git
cd ESP32AirQualityMonitor

# Install bridge dependencies
bun install

# Install dashboard dependencies
cd dashboard
bun install
4. ESP32 Configuration
- Open project in VS Code with PlatformIO IDE
- Update
src/config.hwith your WiFi credentials:
#define WIFI_SSID "your_wifi_ssid"
#define WIFI_PASSWORD "your_wifi_password"
- Build and upload firmware: PlatformIO → Upload (or
pio run --target upload)
5. Dashboard Configuration
- Create environment file:
dashboard/.env.local - Add Firebase configuration:
NEXT_PUBLIC_FIREBASE_API_KEY=your_api_key
NEXT_PUBLIC_FIREBASE_AUTH_DOMAIN=your-project.firebaseapp.com
NEXT_PUBLIC_FIREBASE_PROJECT_ID=your-project-id
NEXT_PUBLIC_FIREBASE_STORAGE_BUCKET=your-project.appspot.com
NEXT_PUBLIC_FIREBASE_MESSAGING_SENDER_ID=your_sender_id
NEXT_PUBLIC_FIREBASE_APP_ID=your_app_id
6. Run the System
# Start MQTT bridge (from project root)
BRIDGE_PORT=3002 bun mqtt-bridge.js

# Start dashboard (in new terminal)
cd dashboard && bun run dev

# Visit dashboard
http://localhost:3000
Project Structure
├── src/                    # ESP32 firmware source code
│   ├── main.cpp           # Main application logic
│   ├── config.h           # Configuration constants
│   ├── wifi_manager.*     # WiFi connection management
│   ├── iot_protocol.*     # MQTT communication
│   ├── sensor_mq2.*       # MQ-2 sensor handling
│   ├── oled_display.*     # OLED display management
│   └── relay_controller.* # Relay control logic
├── dashboard/              # Next.js web dashboard
│   ├── src/
│   │   ├── app/           # App Router pages and API routes
│   │   ├── components/    # React components
│   │   └── lib/           # Firebase configuration
│   ├── public/            # Static assets
│   └── package.json       # Dependencies
├── firebase/              # Firebase configuration
│   ├── firestore.rules    # Firestore security rules
│   └── firebase.json      # Firebase deployment config
├── mqtt-bridge.js         # MQTT bridge server
├── package.json           # Bridge dependencies
├── platformio.ini         # PlatformIO configuration
└── dashboard/docs/SETUP_GUIDE.md # Detailed setup instructions
Configuration
ESP32 Firmware
Edit src/config.h:
// WiFi Configuration
#define WIFI_SSID "your_wifi_ssid"
#define WIFI_PASSWORD "your_wifi_password"

// MQTT Configuration
#define MQTT_BROKER "broker.hivemq.com"
#define MQTT_PORT 1883
#define DEVICE_ID "esp32_01"  // Unique identifier for your device

// Hardware Pin Configuration
#define MQ2_PIN 34            // Analog pin for MQ-2 sensor
#define DHT_PIN 14            // Digital pin for DHT11/DHT22 temperature/humidity sensor
#define RELAY_PIN 26          // Digital pin for relay module (optional)
#define OLED_SDA 21           // I2C SDA pin for OLED
#define OLED_SCL 22           // I2C SCL pin for OLED

// DHT Sensor Configuration
#define DHT_TYPE DHT22        // Type of DHT sensor (DHT22 for better accuracy, DHT11 for basic functionality)
#define DHT_TEMP_OFFSET -2.0   // Temperature calibration offset (adjust based on testing)
#define DHT_HUMID_OFFSET 5.0   // Humidity calibration offset (adjust based on testing)
Web Dashboard
Create dashboard/.env.local:
NEXT_PUBLIC_FIREBASE_API_KEY=your_api_key
NEXT_PUBLIC_FIREBASE_AUTH_DOMAIN=your_project.firebaseapp.com
NEXT_PUBLIC_FIREBASE_PROJECT_ID=your-project-id
NEXT_PUBLIC_FIREBASE_STORAGE_BUCKET=your-project.appspot.com
NEXT_PUBLIC_FIREBASE_MESSAGING_SENDER_ID=your_sender_id
NEXT_PUBLIC_FIREBASE_APP_ID=your_app_id
MQTT Bridge (Optional)
Set environment variables to override defaults:
export MQTT_BROKER=mqtt://broker.hivemq.com
export MQTT_PORT=1883
export DASHBOARD_API_URL=http://localhost:3000
export BRIDGE_PORT=3002
Air Quality Monitoring
The system monitors multiple environmental parameters:
Gas Detection Levels
The system categorizes combustible gas levels based on PPM readings:
- Excellent: < 200 PPM (Very low gas concentration)
- Good: 200-500 PPM (Low gas concentration)
- Moderate: 500-1000 PPM (Moderate gas concentration)
- Poor: 1000-2000 PPM (High gas concentration - safety concern)
- Very Poor: 2000-5000 PPM (Very high gas concentration - immediate danger)
- Hazardous: > 5000 PPM (Dangerous gas concentration - emergency)
Temperature & Humidity Monitoring
The DHT11/DHT22 sensor provides temperature and humidity readings with configurable calibration:
- Temperature accuracy: ±2°C for DHT11, ±0.5°C for DHT22
- Humidity accuracy: ±5% for DHT11, ±2% for DHT22
- Calibrated readings with offset compensation
Dashboard Features
Real-time Monitoring
- Live PPM readings with color-coded quality indicators
- Temperature and humidity readings with calibration
- Device online/offline status
- Relay state indicators
- Last update timestamps
Historical Analysis
- Interactive charts with multiple time ranges
- Average, minimum, and maximum PPM values
- Air quality trend visualization
- Data point counters
Device Controls
- Toggle relay on/off
- Adjust sampling interval (1-60 seconds)
- Send custom messages to OLED display
- Quick action buttons for common commands
MQTT Topics
Data Flow
- Sensor Data:
airquality/esp32_01/sensor - Commands:
airquality/esp32_01/command - Status:
airquality/esp32_01/status
Message Format
Sensor data includes: device_id, ppm, temperature, humidity, quality, relay_state, timestamp Commands include: relay control actions, display messages
Security
- Firebase Authentication for dashboard access
- MQTT broker security considerations for production
- HTTPS communication with Firebase
- Input validation and sanitization
- Environment variables for sensitive configuration
Mobile Support
The dashboard is a Progressive Web App (PWA):
- Installable on mobile devices
- Offline support for basic features
- Responsive design for all screen sizes
- Native app-like experience
Development
ESP32 Development
# Using PlatformIO (recommended)
# Build project
pio run

# Upload firmware to ESP32
pio run --target upload

# Monitor serial output
pio device monitor

# Or install PlatformIO Core CLI directly
pip install platformio
Dashboard Development
cd dashboard
bun install
bun run dev    # Development server
bun run build  # Production build
bun run start  # Production server
MQTT Bridge Development
# Install dependencies
bun install

# Run bridge
BRIDGE_PORT=3002 bun mqtt-bridge.js
Data Flow
Uploading Data
- ESP32 reads sensor data every 5 seconds
- ESP32 publishes data to MQTT broker
- MQTT bridge receives and forwards to dashboard API
- Dashboard updates in real-time
Receiving Commands
- Dashboard sends commands to bridge API
- Bridge publishes commands to MQTT broker
- ESP32 receives and processes commands
- ESP32 executes actions (relay control, display updates)
Monitoring & Maintenance
MQTT Broker
- Monitor message flow and connection status
- Check bridge console for errors
- Verify topic subscriptions
Device Maintenance
- Calibrate MQ-2 sensor monthly
- Check wiring connections periodically
- Update firmware for new features
- Monitor device online status
Troubleshooting
Common Issues
- No data in dashboard: Check MQTT bridge is running, verify ESP32 MQTT connection
- Cannot upload firmware: Check USB connection, COM port, drivers
- WiFi connection fails: Verify credentials in config.h, ensure signal strength
- MQTT connection fails: Check broker URL, internet connectivity
- Bridge errors: Verify dashboard is running on port 3000
Debugging
- Monitor serial output: 115200 baud rate
- Check MQTT bridge console for messages
- Verify all environment variables are set correctly
- Test MQTT broker connectivity
Contributing
- Fork the repository
- Create a feature branch
- Make your changes
- Test thoroughly
- Submit a pull request
License
This project is licensed under MIT License - see the LICENSE file for details.
Support
For detailed setup instructions, refer to dashboard/docs/SETUP_GUIDE.md.
If you encounter issues:
- Check the troubleshooting section above
- Review hardware connections
- Monitor serial output (115200 baud)
- Check MQTT bridge console for errors
- Verify dashboard configuration
Built with ❤️ using ESP32, MQTT, and Next.js
Last updated: August 22, 2026